









A Quarkus service that handles thousands of requests per minute can silently degrade – slow garbage collection pauses, connection pool exhaustion, or a single slow database query without a single log line flagging the root cause. Metrics give you the early signal. Without an instrumented /q/metrics endpoint feeding into a monitoring backend, you are flying blind until a user files a ticket.
This guide walks through the complete setup: adding the Micrometer extension, exposing Prometheus metrics, defining custom business metrics, deploying a ServiceMonitor for Kubernetes scraping, and connecting everything to a backend that makes the data actionable.
Prerequisites
Before starting, confirm the following are in place:
- Java 17 or later, with
JAVA_HOMEset correctly - Apache Maven 3.8.6 or higher (or Gradle 8+)
- An existing Quarkus project (2.x or 3.x – code examples target Quarkus 3.x)
- Quarkus CLI installed (optional but recommended for extension management)
- A running Prometheus instance or access to a managed observability backend
curlfor verifying the metrics endpoint locally- For Kubernetes steps:
kubectlaccess to a cluster and permissions to createServiceMonitorresources
Step 1: Add the Micrometer Prometheus Extension
Micrometer is the recommended metrics library for Quarkus. It provides a vendor-neutral API covering counters, gauges, timers, and distribution summaries, with adapters for Prometheus, Datadog, InfluxDB, OpenTelemetry, and others. The quarkus-micrometer-registry-prometheus extension pulls in Micrometer core and the Prometheus registry in a single dependency.
Add the extension using one of these methods:
Quarkus CLI:
quarkus extension add micrometer-registry-prometheusMaven:
./mvnw quarkus:add-extension -Dextensions='micrometer-registry-prometheus'Gradle:
./gradlew addExtension --extensions='micrometer-registry-prometheus'Or add the dependency directly to your build file:
<!-- pom.xml -->
<dependency>
  <groupId>io.quarkus</groupId>
  <artifactId>quarkus-micrometer-registry-prometheus</artifactId>
</dependency>// build.gradle
implementation("io.quarkus:quarkus-micrometer-registry-prometheus")Once this dependency is present, Quarkus auto-configures the Prometheus registry and exposes metrics at /q/metrics on startup. No additional configuration is required to get the default JVM and HTTP metrics flowing.
Note on SmallRye Metrics: The quarkus-smallrye-metrics extension implements the MicroProfile Metrics specification and was the older approach. As of Quarkus 3.x, SmallRye Metrics is deprecated in favour of Micrometer. New projects should use quarkus-micrometer-registry-prometheus exclusively.
Step 2: Verify the Metrics Endpoint
Start the application in dev mode and confirm the endpoint is responding:
./mvnw quarkus:devIn a separate terminal:
curl http://localhost:8080/q/metricsYou should see Prometheus-format output immediately:
# HELP jvm_threads_live_threads The current number of live threads
# TYPE jvm_threads_live_threads gauge
jvm_threads_live_threads 25.0

# HELP jvm_memory_used_bytes The amount of used memory
# TYPE jvm_memory_used_bytes gauge
jvm_memory_used_bytes{area="heap",id="G1 Eden Space",} 1.234567E7

# HELP http_server_requests_seconds
# TYPE http_server_requests_seconds summary
http_server_requests_seconds_count{method="GET",outcome="SUCCESS",status="200",uri="/hello",} 1.0
http_server_requests_seconds_sum{method="GET",outcome="SUCCESS",status="200",uri="/hello",} 0.018198043The default metrics set includes JVM thread counts, heap memory by pool, garbage collection pause durations, CPU usage, and HTTP request latency broken down by method, status code, and URI. If you have added Hibernate ORM, RESTEasy, Kafka, or Redis extensions, those automatically contribute additional metrics without any manual wiring.
To request JSON format instead of the default Prometheus text format:
curl -i -H "Accept: application/json" http://localhost:8080/q/metricsTo enable JSON format permanently, add this to application.properties:
quarkus.micrometer.export.json.enabled=trueStep 3: Define Custom Application Metrics
The automatic metrics cover infrastructure and HTTP behaviour. Business logic metrics, order processing rate, cache hit ratios, payment failure counts, require explicit instrumentation. Inject MeterRegistry and register meters directly.
Here is a REST endpoint that tracks prime number checks with a counter and measures response latency with a timer:
package org.acme.metrics;
import io.micrometer.core.instrument.Counter;
import io.micrometer.core.instrument.MeterRegistry;
import io.micrometer.core.instrument.Timer;
import jakarta.inject.Inject;
import jakarta.ws.rs.GET;
import jakarta.ws.rs.Path;
import jakarta.ws.rs.PathParam;
import jakarta.ws.rs.Produces;
import jakarta.ws.rs.core.MediaType;
@Path("/orders")
@Produces(MediaType.TEXT_PLAIN)
public class OrderResource {
    private final MeterRegistry registry;
    private final Counter orderCounter;
    private final Counter failedOrderCounter;
    @Inject
    OrderResource(MeterRegistry registry) {
        this.registry = registry;
        // Meter names use dots; Prometheus converts them to underscores
        this.orderCounter = registry.counter("order.processed.total",
                "region", "eu-west");
        this.failedOrderCounter = registry.counter("order.failed.total",
                "region", "eu-west");
    }
    @GET
    @Path("/{id}")
    public String processOrder(@PathParam("id") long id) {
        Timer.Sample sample = Timer.start(registry);
        try {
            // Simulate order processing
            String result = "Order " + id + " processed";
            orderCounter.increment();
            sample.stop(registry.timer("order.processing.duration",
                    "status", "success"));
            return result;
        } catch (Exception e) {
            failedOrderCounter.increment();
            sample.stop(registry.timer("order.processing.duration",
                    "status", "failure"));
            throw e;
        }
    }
}Naming convention to follow: Micrometer meter names use dots (order.processed.total). The Prometheus registry converts these to underscores automatically (order_processed_total). Other backends like Atlas or Graphite apply their own conventions. Always name meters with dots and let Micrometer handle the translation.
Gauge example for tracking an in-memory queue depth:
import io.micrometer.core.instrument.Tags;
import java.util.concurrent.LinkedBlockingQueue;
LinkedBlockingQueue<String> jobQueue = new LinkedBlockingQueue<>();
// Register once during startup
registry.gaugeCollectionSize("job.queue.size", Tags.empty(), jobQueue);Gauges sample the value when Prometheus scrapes the endpoint. They are appropriate for values that go up and down (queue depth, active connection count, cache size). Use counters for values that only increment.
Step 4: Configure Metrics Properties
Quarkus exposes configuration properties to control the endpoint path, tagging, and per-registry behaviour. Add these to src/main/resources/application.properties:
# Change the metrics path (Prometheus default expects /metrics)
quarkus.micrometer.export.prometheus.path=/metrics
# Add global tags applied to every metric
quarkus.micrometer.binder.http-server.match-patterns=/api/v1/.*=/api/v1
# Disable specific binders if not needed
quarkus.micrometer.binder.jvm=true
quarkus.micrometer.binder.system=true
quarkus.micrometer.binder.http-server.enabled=true
# Expose on management interface (separate port) instead of main server
quarkus.management.enabled=true
quarkus.management.port=9000Moving metrics to a dedicated management port (9000 above) is worth doing in production. It means your /metrics endpoint is not exposed on the same port as your public API, making it easier to control access via network policy without touching application routing.
When quarkus.management.enabled=true, the metrics endpoint moves to http://localhost:9000/q/metrics , and the main application server no longer exposes it.
Step 5: Send Metrics via OpenTelemetry
For teams using an OpenTelemetry collector pipeline rather than Prometheus scraping, the quarkus-micrometer-opentelemetry extension pushes all Micrometer metrics through OTLP instead:
quarkus extension add micrometer-opentelemetry<dependency>
<groupId>io.quarkus</groupId>
<artifactId>quarkus-micrometer-opentelemetry</artifactId>
</dependency>Configure the OTLP exporter endpoint in application.properties:
quarkus.otel.exporter.otlp.endpoint=http://otel-collector:4317
quarkus.otel.exporter.otlp.metrics.temporality-preference=CUMULATIVEThis approach unifies metrics, traces, and logs through a single OTLP pipeline, which is the preferred architecture for teams already using distributed tracing. The quarkus-micrometer-opentelemetry extension replaces the Prometheus registry – you cannot use both simultaneously unless you configure a composite registry manually.
For teams evaluating how infrastructure monitoring works at the platform level alongside application-level Quarkus metrics, the OTLP path gives you one collector to manage for all signal types.
Step 6: Configure Prometheus Scraping
With the metrics endpoint running, Prometheus needs to know where to scrape it. For local development, add a scrape job to your prometheus.yml:
scrape_configs:
  - job_name: 'quarkus-app'
    scrape_interval: 15s
    static_configs:
      - targets: ['localhost:8080']
metrics_path: '/q/metrics'For Kubernetes deployments, use a ServiceMonitor resource (requires the Prometheus Operator):
apiVersion: monitoring.coreos.com/v1
kind: ServiceMonitor
metadata:
  name: quarkus-app-monitor
  namespace: my-project
  labels:
    k8s-app: quarkus-app-monitor
spec:
  selector:
    matchLabels:
      app-with-metrics: quarkus-app
  endpoints:
    - port: http
      path: /q/metrics
      interval: 30s
scheme: httpApply the ServiceMonitor after labelling your Kubernetes Service with app-with-metrics: quarkus-app during deployment:
# Label the deployed service
kubectl label service quarkus-app app-with-metrics=quarkus-app -n my-project
# Apply the ServiceMonitor
kubectl apply -f service-monitor.yamlVerify that Prometheus has picked up the target by checking the Prometheus UI at Status > Targets. The quarkus-app job should show UP within one scrape interval.
On OpenShift, you also need to enable user workload monitoring before the ServiceMonitor takes effect:
apiVersion: v1
kind: ConfigMap
metadata:
  name: cluster-monitoring-config
  namespace: openshift-monitoring
data:
  config.yaml: |
enableUserWorkload: trueoc apply -f cluster-monitoring-config.yamlStep 7: Key Metrics to Monitor in Production
Knowing which metrics to alert on is as important as collecting them. Here are the signals that matter most in a production Quarkus deployment, organized by category.
JVM Metrics
| Metric | What it measures | Alert threshold |
|---|---|---|
jvm_memory_used_bytes{area="heap"} | Heap usage by memory pool | Alert when sustained above 80% of max |
jvm_gc_pause_seconds_max | Longest GC pause in the scrape window | Alert above 500ms for latency-sensitive services |
jvm_threads_live_threads | Active JVM thread count | Alert on sustained growth (thread leak) |
jvm_gc_memory_allocated_bytes_total | Bytes allocated since start | Use for GC pressure trending |
HTTP Server Metrics
| Metric | What it measures | Alert threshold |
|---|---|---|
http_server_requests_seconds_count | Request rate by URI, method, status | Use rate() in Prometheus to get RPS |
http_server_requests_seconds_sum | Total latency (divide by count for average) | Alert when P99 exceeds SLA |
http_server_requests_seconds_max | Worst-case latency in scrape window | Alert above 2x your P99 baseline |
http_server_requests_seconds_bucket | Histogram buckets for percentile calculation | Use histogram_quantile(0.99, …) |
System and CPU Metrics
| Metric | What it measures | Alert threshold |
|---|---|---|
system_cpu_usage | Host-level CPU utilisation | Alert above 85% sustained |
process_cpu_usage | JVM process CPU usage | Alert above 70% for more than 5 minutes |
system_load_average_1m | 1-minute load average | Alert when consistently above CPU core count |
Connection Pool Metrics (when using Agroal or Vert.x)
If your Quarkus application uses database connections via Agroal, these metrics appear automatically:
| Metric | What it measures |
|---|---|
agroal_active_count | Connections actively in use |
agroal_available_count | Idle connections ready for use |
agroal_awaiting_count | Threads waiting for a connection |
Alert when agroal_awaiting_count is consistently above zero. That is the first sign of connection pool exhaustion – before errors start surfacing in logs.
Prometheus Alert Examples
groups:
  - name: quarkus-app-alerts
    rules:
      - alert: HighHeapUsage
        expr: >
          jvm_memory_used_bytes{area="heap"}
          / jvm_memory_max_bytes{area="heap"} > 0.85
        for: 5m
        labels:
          severity: warning
        annotations:
          summary: "JVM heap usage above 85% for 5 minutes"
      - alert: HighRequestLatency
        expr: >
          histogram_quantile(0.99,
            rate(http_server_requests_seconds_bucket[5m])
          ) > 2.0
        for: 3m
        labels:
          severity: critical
        annotations:
          summary: "P99 request latency above 2 seconds"
      - alert: ConnectionPoolExhaustion
        expr: agroal_awaiting_count > 0
        for: 2m
        labels:
          severity: warning
        annotations:
summary: "Database connection pool has waiting threads"Step 8: Connect to a Full Observability Backend
Prometheus and Grafana give you metrics storage and dashboards. But metrics alone do not surface root causes; you need traces to see which code path is slow, and logs to see what was happening at that moment. Teams using top infrastructure monitoring tools alongside Quarkus typically integrate a backend that correlates all three signal types.
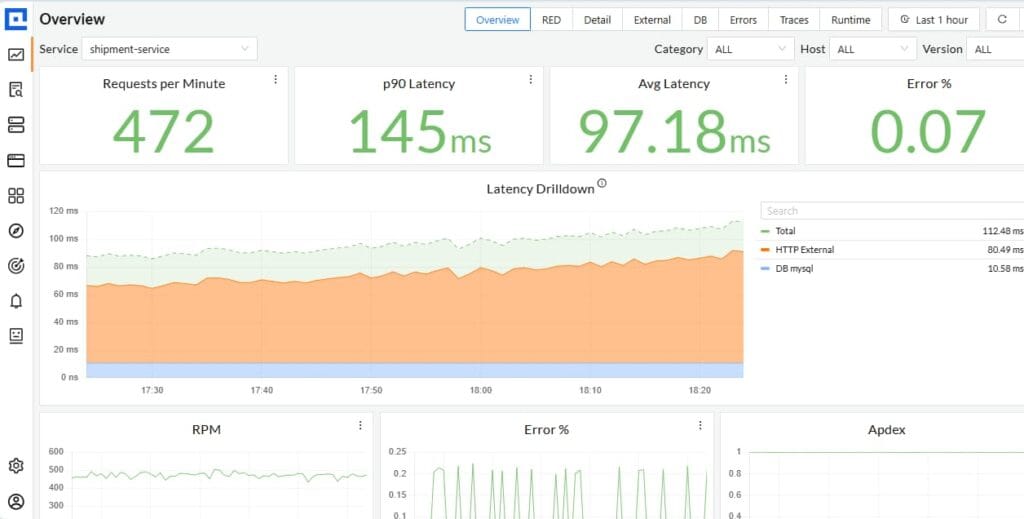
CubeAPM accepts Quarkus metrics via Prometheus remote write or through an OpenTelemetry collector, and correlates them with distributed traces and logs in a single view. It runs inside your own VPC or on-premises, which means Quarkus telemetry never leaves your infrastructure. Pricing is $0.20/GB of ingested data with no per-seat or per-host charges – for a team ingesting 5TB/month of combined traces, logs, and metrics, that is $750/month flat with unlimited retention.
CubeAPM is OpenTelemetry-native, so the quarkus-micrometer-opentelemetry setup from Step 5 feeds directly into it without any proprietary agent. You get RED metrics (Rate, Errors, Duration) at the service and endpoint level, correlated with trace context, plus infrastructure metrics from the same host running your Quarkus process.
Grafana + Prometheus is a strong open source option for teams that want full control. The operational overhead is real: you manage Prometheus retention, Thanos or Cortex for long-term storage, and separate Loki for log correlation. For teams already running this stack, adding a Quarkus scrape job is straightforward.
Datadog and Dynatrace both have Quarkus integrations via their respective Micrometer registry extensions (quarkus-micrometer-registry-datadog from Quarkiverse). The cost difference at scale is significant – Datadog APM runs $31/host/month for the APM add-on, which compounds quickly across a microservices fleet.
For teams that want to understand real user impact alongside backend metrics, exploring what real user monitoring provides gives useful context on correlating frontend experience data with the Quarkus metrics you are now collecting.
Troubleshooting Common Issues
Metrics endpoint returns 404
The extension is not on the classpath, or the metrics path has been changed. Verify the dependency is present in pom.xml or build.gradle. Check application.properties for quarkus.micrometer.export.prometheus.path — if set, use that path instead of /q/metrics. In dev mode, check the startup logs for Installed features: [micrometer, ...].
Custom metrics show no data after first request
Micrometer constructs meters lazily – a counter or timer only appears in the output after it has been used at least once. Call the endpoint or trigger the code path once, then scrape again. This is expected behaviour, not a bug.
Prometheus scrape shows `connection refused`
If you enabled the management interface (quarkus.management.enabled=true), the metrics endpoint moved to port 9000. Update your Prometheus scrape config or ServiceMonitor to target the correct port. Verify with curl http://localhost:9000/q/metrics.
JVM metrics are missing
JVM binders are enabled by default, but can be disabled explicitly. Check application.properties for quarkus.micrometer.binder.jvm=false and remove or flip it to true.
HTTP metrics show `uri=”UNKNOWN”` for some routes
This happens when Quarkus cannot match the request URI to a JAX-RS or Reactive Routes template. It typically occurs with reactive routes that do not have a named pattern, or when a filter intercepts the request before routing. Add quarkus.micrometer.binder.http-server.match-patterns to map raw paths to labelled patterns.
Histogram quantiles are inaccurate
Micrometer publishes pre-aggregated summary statistics by default, not full histograms. To use histogram_quantile() in Prometheus, enable histogram publishing:
Timer timer = Timer.builder("http.server.requests")
    .publishPercentileHistogram()
.register(registry);Or configure it globally in application.properties:
quarkus.micrometer.binder.http-server.histogram=trueOpenShift ServiceMonitor not picking up targets
Confirm that user workload monitoring is enabled on the cluster (the ConfigMap step in Step 6). Check that the ServiceMonitor namespace and label selectors match the deployed Service exactly. Run kubectl describe servicemonitor quarkus-app-monitor -n my-project to see selector details and verify the Service has the matching label.
Quarkus monitoring with Micrometer gives you a solid foundation: automatic JVM and HTTP metrics from the moment you add one dependency, a clean API for custom business metrics, and flexible export options ranging from Prometheus scraping to OTLP push. The setup is intentionally low-friction – a single extension, a scrape config, and a handful of alert rules cover most production scenarios. The real value comes when those metrics feed into a backend that correlates them with traces and logs, turning a raw number like P99 latency or heap usage into a pointed root cause you can act on.
Disclaimer: The information in this article reflects the latest details available at the time of publication and may change as technologies and products evolve. Features, pricing, and plan limits can change over time. Always verify the latest information directly with the vendor before making purchasing or deployment decisions.
Pricing figures cited for third-party tools are based on publicly available rate cards at the time of writing. Actual costs depend on usage, negotiated contracts, and plan tier. Verify current rates at each vendor’s official pricing page before committing.
Frequently Asked Questions
What is the difference between quarkus-micrometer and quarkus-smallrye-metrics?
`quarkus-micrometer` implements the Micrometer API and is the recommended approach for Quarkus 2.x and 3.x. It supports dimensional metrics and multiple backends including Prometheus, OpenTelemetry, and Datadog. `quarkus-smallrye-metrics` implements the older MicroProfile Metrics specification and is deprecated as of Quarkus 3.x. New projects should use Micrometer. Existing SmallRye Metrics projects should plan migration to Micrometer.
Why does my custom metric not appear in the /q/metrics output?
Micrometer creates meters lazily. A counter, timer, or distribution summary only appears in Prometheus output after the code path that registers or increments it has been executed at least once. Trigger the relevant endpoint or business logic, then scrape again to see the metric. This behaviour is intentional and documented in the Micrometer project.
Can I expose Quarkus metrics on a separate port from the main application?
Yes. Set `quarkus.management.enabled=true` and optionally `quarkus.management.port=9000` in `application.properties`. The metrics endpoint moves to the management port, and the main HTTP server no longer exposes it. This lets you lock down metrics access via network policy without touching application-level routing.
What is the default path for Quarkus metrics and can I change it?
The default path is `/q/metrics`. You can change it by setting `quarkus.micrometer.export.prometheus.path=/metrics` in `application.properties`. The alternative path `/metrics` is what most Prometheus configurations expect by default, so changing it can simplify scrape config for teams standardising across multiple services.
How do I add global tags to all Quarkus metrics?
Inject a `MeterRegistryCustomizer` bean that calls `registry.config().commonTags(…)` on startup. You can add environment, region, or service name as tags this way. Alternatively, use `quarkus.micrometer.binder.http-server.match-patterns` for HTTP-specific tag normalisation. Global tags appear on every metric emitted by the application and are useful for filtering in Prometheus or Grafana across a multi-service deployment.
Should I use Prometheus scraping or OpenTelemetry push for Quarkus metrics?
Use Prometheus scraping if you already run a Prometheus stack and want pull-based metrics with local control. Use the `quarkus-micrometer-opentelemetry` extension if you have an OTLP-compatible backend and want to unify metrics, traces, and logs through a single collector pipeline. The OTLP approach is better for Kubernetes environments where push-based telemetry simplifies firewall and network policy management.
What Quarkus metrics are most important to alert on in production?
Start with four signals: heap usage above 85% of max (`jvm_memory_used_bytes`), GC pause duration above 500ms (`jvm_gc_pause_seconds_max`), P99 HTTP latency above your SLA threshold (`histogram_quantile(0.99, …)`), and connection pool waiting threads above zero (`agroal_awaiting_count`). These four cover the most common production failure modes in Quarkus services: memory pressure, GC storms, latency regressions, and database saturation.